Green Edge Kids Boys Boxers $15 each
Lapsaky Organics Boys Boxers $14 each
Charlie Banana 3 Pack Boy Boxers $24.53 @ Amazon
Other sites I found mentioned different brands but when I called the company, they no longer make the toddler boxers such as Under The Nile. Bummer.
Next I began to wonder exactly how hard would it be to make them? I found an easy pattern from You Can Make This for $6.95. The download includes sizes 2/3, 4/5 and 6/7. The cool thing is that I can download the pattern as many times as I need and print it out. I should be able to use the same pattern for the next couple of years for both kids! As a side note, I emailed the company to make sure this was something even I could handle and was assured that 1. It is a beginner project and 2. If I had any problems, I could contact them. Excellent.
My next stop was Fabric.com for some organic cotton knit fabric. I placed the order for some electric blue fabric that was on clearance for $4.95/yd and picked out a couple of other 1/2 yard cotton fabrics to round out my order and get free shipping (must order $35). Now two days after I placed my order it hit me that I didn't order the elastic. Whoops. I stopped into Joann's Fabric and bought some. I must admit though, Joann's price was $.79/yard while Fabric.com was $.29/yard. Next time I will make sure to order everything I need in one place to save myself time and money.
When my package from Fabric.com arrived it was sans the knit fabric. Turns out that they ran out. I ended up placing a second order with multiple colors of the organic knit fabric just to make sure they could send me some. Of course, there was none for $4.95, it was $7.98 now. Once the fabric arrived, I got to work.
We printed the pattern and taped it together. I went with the 4/5 size because L1's hips are 20 inches and he is pretty tall. There were 2 pieces. I then traced and cut (I used safety pins because I couldn't find straight pins):
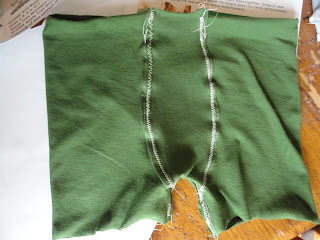
I sewed the cod piece to the main piece. Note: This is what it looks like inside out so that you can see the stitching. Pretty simple.
Then I had a little trouble attaching the elastic. For some reason my machine wasn't feeding it through and the bobbin was catching and the thread was breaking. My father-in-law fixed it and sewed the elastic on (a little differently than the instructions but functional).
There you have it. A completed sewing project. A first attempt. My next couple of pairs will look better. No matter how imperfect they look, they are soft and L1 loves them.
Overall this was pretty easy once I figured out exactly what to do. The tracing and cutting took the most time. I think I will trace and cut a couple of pairs and then sew them all at once next time. After the first pair, I could see how this could be completed in under an hour. With one person cutting and one sewing, it would go super quick. As for sizing, I am glad that I went a size up. At this point, a little looser is better so that he has no trouble getting them up and down by himself. He could probably fit into the 2/3 size but really, why make more work?
This was a fun project to start with. I can't wait to make some more and try out some other patterns.
This article was listed on The Selfsufficient Homeacre Wildcrafting Wednesday
This article was shared on Sustainable Suburbia.
This article was shared on Gluesticks.


Wow! I never would have thought to make my kids undergarments! Awesome! :) Thank you for sharing this on Wildcrafting Wednesday! :)
ReplyDeleteThat looks awesome, I really like how it turned out.
ReplyDelete